Despite what it might seems at a first look, this is NOT a complicated thing.
The advantages are enormous… especially if you own a developer account: it would allows you to test the evolution of this awesome OS blended with great benefits of virtualization such as snapshotting.
Whatever is the reason why you wanna install Mavericks on your ESXi box, you’ll find here detailed instructions which have been tested and found working by me 
First of all, you need an important piece of software… and no, this software is not illegal, nor it could ruin your precious ESXi 5.1 installation. I’m talking about the mighty Unlocker for VMware by Donk, available from InsanelyMac (free registration).
This is a bunch of bytes which will enable your ESXi to boot a valid Mavericks image.
Once you retrieve the needed software (at the time of this article version 1.20 has been released), you need to unzip and scp/vSphere the 3 needed files for ESXi to your hypervisor.
WARNING: do NOT execute them from / but copy them in a folder you created in /store or something similar.
The good news is that once you execute the included install.sh, if you wanna revert there is a ready made uninstall.sh to restore previous situation…
The unlocked will complete rather quickly, then you can start building your environment as detailed below.
Naturally, you need to have an Apple original “Install OS Mavericks” package obtained from the App Store, since we’re not talking Hackintosh in Techiezone 
I have the Install OS X Mavericks software under /Applications directory on my Mac, downloaded from Apple Mac App Store (it’s about 5.31 Gb).
First of all, we need to prepare the installation image starting from the original. The image we’ll create and use for the installation is called mavericks-esxi.dmg in the Desktop folder of the logged on user.
Open a Terminal, then type the command:
hdiutil convert -format UDRW -o Desktop/mavericks-esxi.dmg /Applications/Install\ OS\ X\ Mavericks.app/Contents/SharedSupport/InstallESD.dmg

The output on an Italian version of OS X is similar to the following:
MBP-Marco:~ RoarinPenguin$ hdiutil convert -format UDRW -o Desktop/mavericks-esxi.dmg /Applications/Install\ OS\ X\ Mavericks.app/Contents/SharedSupport/InstallESD.dmg
Leggo Driver Descriptor Map (DDM : 0)…
Leggo (Apple_Free : 1)…
Leggo Apple (Apple_partition_map : 2)…
Leggo disk image (Apple_HFS : 3)…
.............................................................................
Leggo (Apple_Free : 4)…
Tempo trascorso: 9m 48.939s
Velocità: 8.8Mbyte/sec
Salvataggi: 0.0%
created: /Users/RoarinPenguin/Desktop/mavericks-esxi.dmg
MBP-Marco:~ RoarinPenguin$
Then we need to extend the size of our newly created image to 9 Gb using the command:
hdiutil resize -size 9g Desktop/mavericks-esxi.dmg
This command will complete without any output. We need to mount out new image, to be able to work on it. Use the command:
hdiutil attach Desktop/mavericks-esxi.dmg
The expected output, which might be slightly different on your Mac (especially if you have external HDD or USB keys connected) is:
/dev/disk1          Apple_partition_scheme
/dev/disk1s1        Apple_partition_map
/dev/disk1s2        Apple_HFS                      /Volumes/OS X Install ESD
take note of the path where Apple HFS filesystem is mounted, in my case this is /dev/disk1s2.
Use the command
sudo disktool -A /dev/disk1s2 (you might want to replace this path with the path you noted previously on your system)
If you use this command on a system which is already upgraded to Mavericks, it will return a warning like:
diskutil: please use diskutil(8) instead of disktool
File system user/group ownership enabled
Then you’ll mount the original installer again with the command:
hdiutil mount /Applications/Install\ OS\ X\ Mavericks.app/Contents/SharedSupport/InstallESD.dmg
The expected output is:
Calcolo checksum di Driver Descriptor Map (DDM : 0)…
     Driver Descriptor Map (DDM : 0): verificato   CRC32 $84BDB567
Calcolo checksum di  (Apple_Free : 1)…
                    (Apple_Free : 1): verificato   CRC32 $00000000
Calcolo checksum di Apple (Apple_partition_map : 2)…
     Apple (Apple_partition_map : 2): verificato   CRC32 $B8F227AF
Calcolo checksum di disk image (Apple_HFS : 3)…
..............................................................................
          disk image (Apple_HFS : 3): verificato   CRC32 $994EF25A
Calcolo checksum di  (Apple_Free : 4)…
                    (Apple_Free : 4): verificato   CRC32 $00000000
verificato   CRC32 $E3E51727
/dev/disk2          Apple_partition_scheme
/dev/disk2s1        Apple_partition_map
/dev/disk2s2        Apple_HFS                      /Volumes/OS X Install ESD 1
Then we proceed to modify our newly created image to make it bootable on a “unlocked” ESXi 5.1 system as follows.
hdiutil attach /Volumes/OS\ X\ Install\ ESD\ 1/BaseSystem.dmg
/dev/disk2          Apple_partition_scheme
/dev/disk2s1        Apple_partition_map
/dev/disk2s2        Apple_HFS                      /Volumes/OS X Install ESD 1
sudo disktool -A disk2s2 ##=> once again, check that you use correct /dev/disk_name here
hdiutil attach /Volumes/OS\ X\ Install\ ESD\ 1/BaseSystem.dmg
Calcolo checksum di Driver Descriptor Map (DDM : 0)…
Driver Descriptor Map (DDM : 0): verificato CRC32 $01CEE39B
Calcolo checksum di (Apple_Free : 1)…
(Apple_Free : 1): verificato CRC32 $00000000
Calcolo checksum di Apple (Apple_partition_map : 2)…
Apple (Apple_partition_map : 2): verificato CRC32 $4F771A3A
Calcolo checksum di disk image (Apple_HFS : 3)…
..............................................................................
disk image (Apple_HFS : 3): verificato CRC32 $69310D69
Calcolo checksum di (Apple_Free : 4)…
(Apple_Free : 4): verificato CRC32 $00000000
verificato CRC32 $65D61011
/dev/disk4 Apple_partition_scheme
/dev/disk4s1 Apple_partition_map
/dev/disk4s2 Apple_HFS /Volumes/OS X Base SystemFinally, we copy the directory entries into our new image with the command:
sudo ditto /Volumes/OS\ X\ Base\ System/ /Volumes/OS\ X\ Install\ ESD
…and we detach the unused image:
hdiutil detach /Volumes/OS\ X\ Install\ ESDCongratulations… so far so good. We have now a cool new image of Mavericks ready to be booted on our VMware ESXi 5.1 system.
Transfer it on the system using, for example, scp.
On ESXi 5.1, create a new Virtual Machine (typical is fine) and give it a name. Select the storage destination.
Choose the guest system, type to be Apple Mac OS X 10.7.(64-Bit). Setup the network or leave the default.
This provisioning technique is fine for the HDD. Edit the configuration.
Set CPU sockets to 2 to give to the baby a little power
VERY IMPORTANT: set the CD/DVD to be connected at boot, otherwise Mavericks won’t boot. Set it to use ISO image, browse the datastore and (enable “show all types”) select the mavericks-esxi.dmg you uploaded previously.
Here we go! Boot it and… let’s proceed
Once you choose the language at boot of Mavericks, run Disk Utility and initialize the Disk giving it a name (I called it VirtualMac HD). Close Disk Utility and from the previous menu select Terminal.
Run the command:
installer -pkg /Packages/OSInstall.mpkg -target /Volumes/VirtualMac\ HDThis command could last 10/20 minutes depending on the speed of your ESXi system, and will terminate with:
“installer: The install was successful.”
Exit Terminal and select the startup disc to be you new
VirtualMac HD OS X, 10.9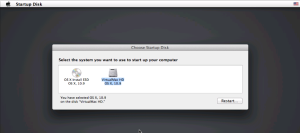
Reboot and…
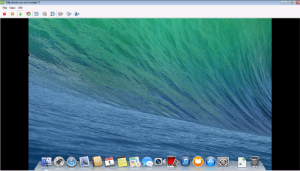
…enjoy your new virtualized Mavericks installation!
Did you find this article useful? Please use comments here below to share your experience!
RoarinPenguin